home

Friday, March 16, 2012

temp converter part two

8. After ViewController.h done then click on ViewController.m, you could find the code at ViewController.m like the code below:


//
//  ViewController.m
//  converter
//
//  Created by.... on....
//  Copyright (c) 2012 your company. All rights reserved.
//

#import "ViewController.h"

@implementation ViewController
@synthesize fahrenheit;
@synthesize celsius;

*Note = these codes below came from IBOutlet on ViewController.h that we made it before.

@synthesize fahrenheit;
@synthesize celsius;

next step is =

insert the following code just below the code

-(void)viewDidLoad
{
    [super viewDidLoad]; 

the code is =

fahrenheit.keyboardType = UIKeyboardTypeDecimalPad;


9.  Change the code below =

- (IBAction)convert:(id)sender {
}

copy and paste with the code below =

 - (IBAction)convert:(id)sender {
    float x = [[fahrenheit text] floatValue];
    float y = (x - 32.0f) * 5.0f / 9.0f;
    [celsius setText : [NSString stringWithFormat:@"%.3.2f", y]];
    [fahrenheit resignFirstResponder];
}


then run the application, have a nice try 


Continue Reading...- temp converter part two />

temp converter

Before you make temp converter,you would like to see the first tutorial

In this tutorial I would like to show you how to make a simple temperature converter unit. The basic formula in this case is


C=(F-32).5/9

c = celsius, F = Fahrenheit
Celsius equal (Fahrenheit - 32) multiplied by 5/9

And step by step how to make this apps 

1. Open Xcode and create a new project. Choose a single view apps and Fill the product name = converter,company identifier = name of your company, class prefix = leave it blank, device family= iphone or ipad or universal, and use Storyboard then press Next button
2.For ease you could create and place your project on your dekstop,then you will see the first page of Xcode like the image below


Press the main Storyboard 

3. After that for the next page you will see on your storyboard like an image below, we could change the background image from default to another background on the right side 


4. Drag and drop two label buttons, two text buttons, and one button in to storyboard,then change those label to Fahrenheit and Celsius,leave the text button blank,and change the button to Convert button 


5. Then insert the code to ViewController.h, on the text button please click right at your mouse----->hold then drag and drop below the code 

#import <UIKit/UIKit.h>

@interface ViewController : UIViewController 


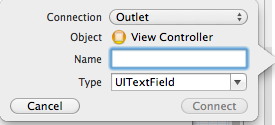
6. Fill the name of the text label (Fahrenheit and Celsius) you could see the image below then press connect


*NOTE =
connection = Outlet
name = Fahrenheit and Celsius
Type = UITextField 


7. And also the convert button fill the name of it. Change the button to Action 


continued on part two


Continue Reading...- temp converter />

Thursday, March 15, 2012

run application

how to run your application


after the project is complete you should try it first by running the IOS simulator.

find the run button on the top left corner
or you could click product on your xcode then press run.And you also could change the simulator on ipad or iphone


Continue Reading...- run application />

create hello world apps

hello world apps is basic tutorial for create apps on iphone or ipad using Xcode.For Example here using xcode 4.2.

1. Open your xcode and create a new project.


2. Choose single view apps and press Next button

3. Fill your product name (hello world apps for example),  company identifier (your company name), class prefix (for example here,leave it blank),device family( you could change to ipad or universal,here i use iphone device),use storyboard and press next button

 4. For ease, you could create your project on your desktop.then press Main Storyboard

5.Drag and drop label button then change the label name to Hello world!! you could change to any word you like


6. You could see the image below

7.Then run the application by clicking run button on the top left corner

this apps without editing code at all,Have a nice try.....
Continue Reading...- create hello world apps />

about xcode


The Xcode developer tools package provides everything you need to create great applications for Mac, iPhone, and iPad.

Xcode is tightly integrated with the Cocoa and Cocoa Touch frameworks, creating a productive and easy-to-use development environment that is powerful enough to be the same tools used by Apple to produce Mac OS X and iOS. The Xcode toolset includes the amazing Xcode IDE, with the Interface Builder design tool and Apple LLVM compiler fully integrated. The Instruments analysis tool is also included, along with dozens of other supporting developer tools.
Designed from the ground up to take advantage of the newest Apple technologies, Xcode integrates all the tools you need. The unified interface smoothly transitions from composing source code, to debugging, and even to designing your next stunning user interface, all within the same window.
The Xcode workspace is all about keeping you focused. As you type, Live Issues will immediately alert you to coding mistakes, displaying a message bubble beside your code for more detail. Hit the Run button to launch your Mac app, or upload the app to your test device, and immediately start debugging. Hover the mouse pointer above a variable to inspect its value at runtime, never having lost your place in the editor.
By working closely with the developer web portal, Xcode provisions new iOS devices with a single click, can securely sign and archive your Mac or iOS app, and directly submit it to the App Store
source apple.com
before starting to make apps you need to download for free!  Xcode at apple.com 

requirement =


- any mac,mac book air, mac book pro,mac mini
- apple ID


Continue Reading...- about xcode />